
Tailored PRINCE2 processes
and templates for ICT Projects
Glidepath Project Method
What is Glidepath Project Method?
Glidepath is a simple set of templates and guides that simplify the management of Information, Communications and Technology (ICT) projects, without the need for complex systems tooling. Unlike complex subscription systems, Glidepath provides a level of planning and customisation that is perfect for once-off projects. All that’s required is a secured shared folder, such as Google Drive, to facilitate collaboration.
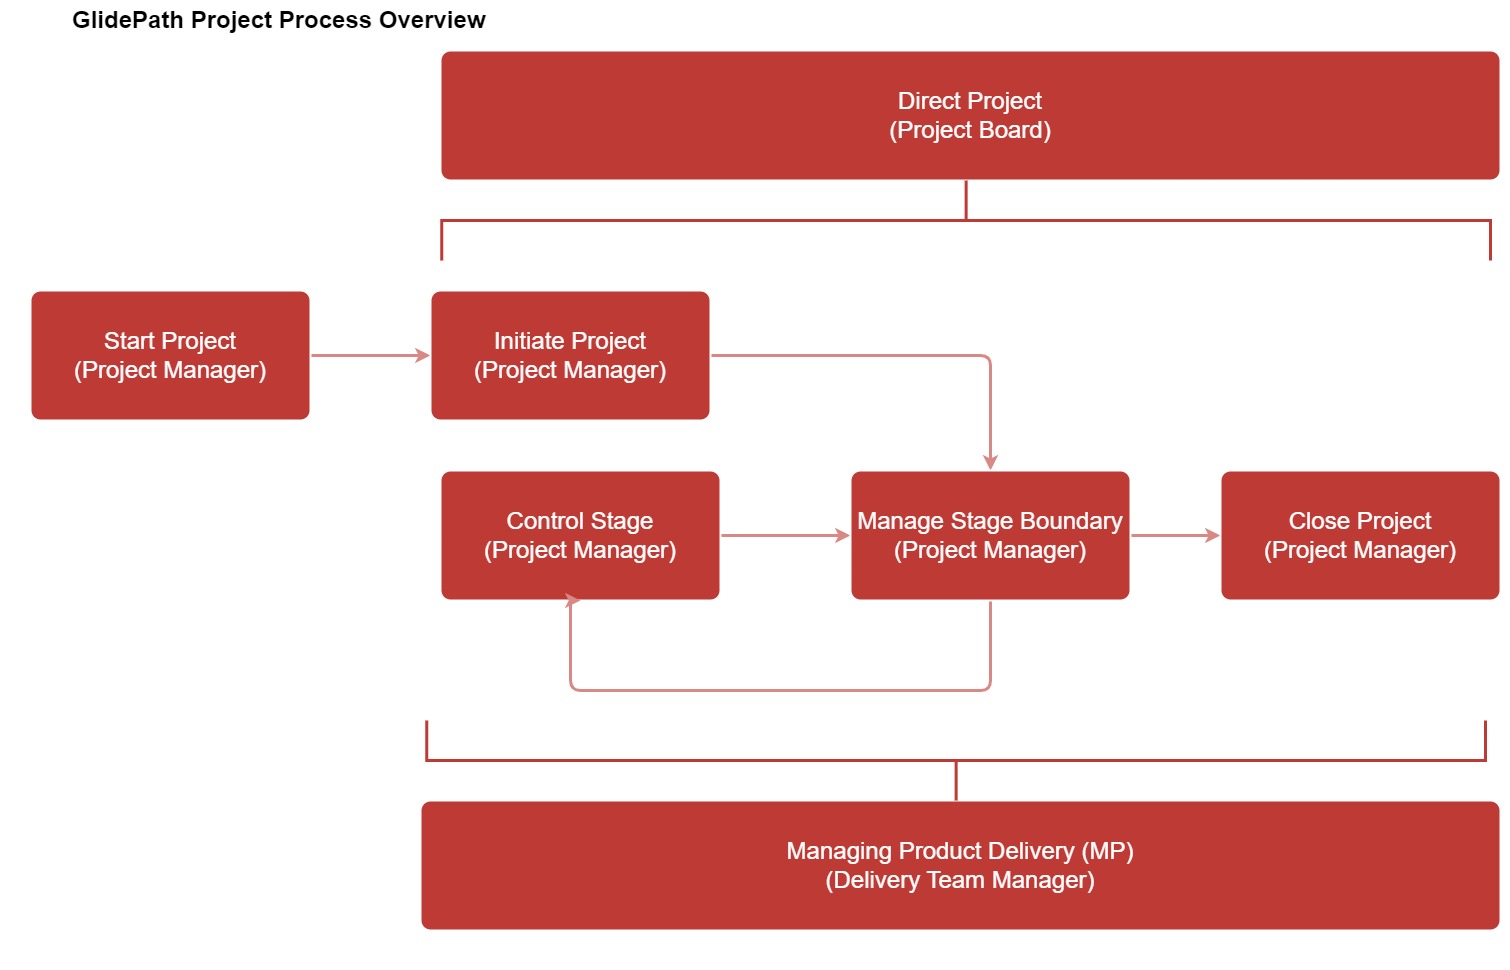
Glidepath Project Method has been developed over the past 20+ years, drawing from the expertise of numerous project and program managers who have contributed to its evolution. It utilises a tailored PRINCE2 method that leverages the credentials of this proven best practice framework, while also incorporating Agile techniques that are widely used in the delivery of ICT projects, particularly software development.
Rather than starting from scratch, Glidepath expedites project initiation by providing comprehensive templates and processes that enable teams to get started quickly. The process diagrams are simplified and streamlined for readability, with the goal of ensuring that all project team members, not just project managers, can follow and apply them effectively.
Please note that the content on the Glidepath site is constantly evolving and subject to change without notice. However, previous versions of the template are always available for download from the templates page.
Using Glidepath Project Method
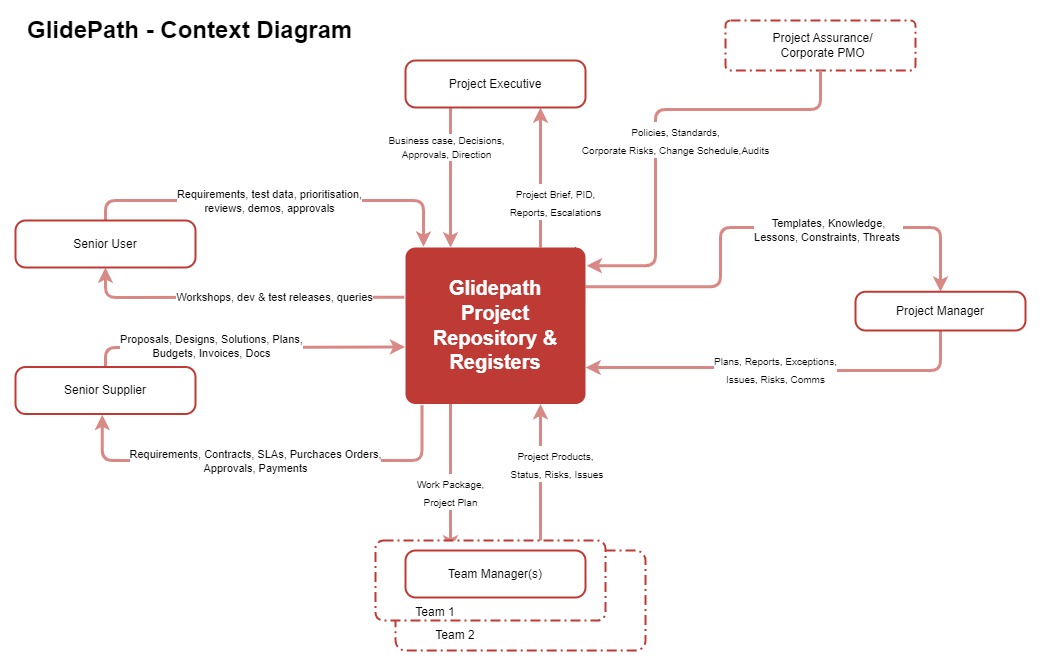
The Glidepath Project Method utilises a set of templates that aid the project management team in developing the necessary artifacts for effectively managing an ICT project. These templates have been created using Google Docs and Google Sheets, and are intended to prompt the team during the project creation process.
To access the templates, you can either make a copy to your Google Workspace one at a time, or download a zip file in Microsoft Word and Excel format in the GLP000 Glidepath Pack for a fee. The pack file also contains several folders, including the Project folder, which outlines the project’s folder structure, and the Release folder, which contains all of the previous Glidepath releases. Additionally, the Templates folder contains all of the current artifact versions.
To set up the templates the project manager or project support should add the program and project details at the start of the project to create the necessary project management products. This includes setting up the logs and registers, which must contain data validation records with the required options in the Control sheets. It is essential to store these logs and registers in a shared folder with appropriate permissions granted to the project stakeholders, with edit access granted to the project management team, and view-only access for other stakeholders.
Template Usage Guides
GLP001 Daily Log
The Daily Log is the project manager’s journal of events that happen throughout the project. It is the first log that is produced and captures all of the events to provide an audit trail and historic timeline to auditors, as well as an aid to highlight and stage reporting. Events are recorded in reverse chronological order so that the most recent events on a long log are displayed at the top.
Process
- Gather information about the event e.g. Issue ID/Risk ID, people involved, etc.
- If all the templates have been filled, add a row to the log by inserting a new row below the title row
- Increment the Event ID
- Capture the date of the event
- Select the Process/Stage for the event from the data validation list
- Identify who performed/initiated the event within the Person Responsible e.g. a problem/issue was raised during a meeting
- Provide a brief description and/or the title of the event. This should be aligned with any other artifact produced i.e. a risk raised should have the identical title
- Identify the target date/commitment given for follow-ups
- Record any follow-up activities or artifacts produced. Where possible, highlight the title with a link (URL) to the artifact
GLP002 Lessons Log
The Lessons Log is a storehouse of lessons learnt during the execution of the project. Lessons sought, recorded, and executed during the course of the project are recorded in one place and submitted to the Project Board at the end of the project. Lessons recorded may be used in the current project and should be retained as collateral for future projects by the corporate organisation or programme management office (PMO), i.e. forming part of future project assurance and support.
Process
- Gather Lessons Report from other projects, the current project brief, other reports in PID
- If all the templates have been filled in, add a row to the log by inserting a new row below the title row
- Increment the Lesson ID
- Capture the date of the lesson logged
- Summarise the details of the lesson and the lesson type
- Establish the priority of the lesson
- Update the revision history information such as date and changes made
- Identify the person responsible to approve as well as distribute the changes made
- Provide a brief description and/or the title of the event, aligned with any other artifact (e.g. a risk raised should have the identical title)
- Ensure that this log is reviewed, maintained, and retained after project completion
GLP003 Business Case
The Business Case is the “Business Justification” document that outlines the valid reason for doing the project, its viability, and the achievable benefits. This document is created at the start of the project and is reviewed at each stage boundary, and when material requests for changes or exception reports are raised, to ensure the project remains viable with achievable benefits.
Process
- Write the Executive Summary
- State the objectives of the project and the rationale for undertaking it. They should be aligned with the corporate or programme strategy
- Define the benefits and return on investment of the project – how much it will cost versus how much it will save – and what will qualify as a successful outcome
- Create the financial assessment, comparing and contrasting all available options
- Define possible risks and any negative outcomes – exploring what can or could go wrong by consulting identified stakeholders
- Define the timeline for delivery of the project as well as for the benefits derived
- Document how the project will be funded (extra expenditure or offset against existing/budgeted costs)
GLP004 Product Project Description
The Project Product Description defines the main products to be produced by the project. It includes the customer’s acceptance, quality expectations, methodology, and responsibilities for the product development activities carried out under Manage Product Delivery.
Process
- Define the purpose of the product
- Define the scope of the project and how the product(s) to be developed will achieve the required scope
- Identify the source from which the product components will be derived or developed (e.g. build, buy, subscription for cloud services)
- Define tolerances at the project level for variances and/or off specifications
- Define the acceptance criteria against which the product will be assessed for all stakeholders, along with the acceptance method
- Establish responsibilities for confirming acceptance of the products described
GLP005 Project Brief
The Project Brief is written by the Project Board during the Start Project process. As the primary document to achieve consensus and approval of the Executive and Corporate, it provides a firm basis to the Project Board to initiate the project, while minimising cost and effort in case the project is cancelled. Once approved, the content then moves to the Initiating a Project process and becomes a part of the Project Initiation Documentation (PID), after which it is retained for reference and lessons learned.
Process
- Define the project approach, considering solutions such as bespoke/off-the-shelf/cloud, or in-house vs. contracted teams
- Define the project objectives ensuring they are Specific, Measurable, Achievable, Realistic, and Time-bound (SMART)
- Create the structure of the Project Management Team and establish the responsibilities of each person (see Glidepath RASCI), ensuring they are suitable and available during the planned timeframe
GLP006 Project Initiation Document
The Project Initiation Document (PID) defines the project in detail and acts as a baseline document to assess progress, issues, and ongoing viability. It is created toward the end of the Initiation Stage to bring together all known information about the project.
Process
- Define the project details and approach
- Define the relationships and lines of authority for all role descriptions agreed with their owners
- Outline the reporting and direction regime, ensuring appropriateness for the project’s scale, risk, and importance
- Create the content for the plans (Quality, Risk, Communication, Configuration Management)
- Set up project controls/dashboards, defining reported data and aligning with programme/corporate standards
- Define tolerances for costs, scope, time, quality, benefits, and risks, giving flexibility to the project team
- Ensure the PID is reviewed/approved by the end of Initiate Project stage, signalling approval to proceed
- Baseline the approved PID by creating a new version and saving a PDF copy for future reference
- Share the approved PID with all authorised stakeholders
GLP007 Risk Management Plan
The goal of this Risk Management Plan is to minimise the effects of uncertainty on the project objectives by anticipating what could go wrong (or right) and ensuring that early warning mechanisms are in place.
Process
- Draft the Risk Management Procedure including sub-processes and owners for identifying, planning, assessing, implementing risk actions, and communicating the known risks
- Ensure scales, expected values, and proximity definitions are clear, unambiguous, and aligned with the organisation’s standards and risk appetite
- Maintain the Risk Register, ensuring the captured information meets defined quality criteria
- Define risk reporting and timing (e.g. fortnightly risk reviews, tactical response sessions)
- Outline and agree responsibilities for both internal team members and external customers/suppliers
GLP008 Risk Register
The Risk Register is the record of all identified risks, including their history, current status, and action plans.
Process
- Capture a concise, unambiguous, meaningful risk description (e.g., “Given that… Result or outcome… Impact…”)
- Increment and capture a new Risk ID for unique reference
- Choose the risk type from the drop-down menu (configurable in the Control worksheet)
- Define proximity (when the risk may happen)
- Define the risk’s probability (pre/post-response) from the drop-down
- Define the estimated financial impact per incident
- Calculate expected monetary value (probability × financial impact)
- Establish a risk response category from the drop-down
- Record the date and person who raised the risk
- Define the risk owner (not the PM), responsible for responding to the threat
- Define next steps and the person responsible
- Update risk status and capture the last updated date
GLP009 Change Control Plan
The Change Control Plan is used as a guideline to identify how baselines and products developed during the project are controlled. Change requests should bring benefits (e.g. new capabilities, products, cost savings) or address material issues and risks arising during the project.
Process
Within the Change Control Plan, describe the step by step procedure for putting forth a change request –
- Identifying a change. A material change should be concisely and consistently captured and its benefits, scope, time cost, quality and risk defined in succinct detail
- Proposing a change within the scope of context of a live project taking into account the environment and resources that are available, or could be made available
- Assessing the impact of the proposed change
- Evaluating the Project Manager’s recommendations
- Making decisions on the change, this may involve meetings between Project Manager and Project Board to consider the recommendations made by the former, especially where they breach any agreed tolerances
- Defining the decision options available to the Project Board
- Defining the change made
- Updating the change request and issue register, as well as capturing all other content and deliverables produced by the change
- Usage of any templates defined for logging change requests
- Updating the Issue Register and Daily Log
- Rating the change on the scale of urgency and impact
- Defining the timescale and the prioritisation for issue management
- Defining the reports to be submitted
- Defining the responsibilities of the people managing the issue
GLP010 Configuration Items Records
Configuration Item Records capture details of each project product. The level of detail depends on complexity but should not be overcomplicated unless required. If a Configuration Management Database (CMDB) is available, the project may import CI records directly into it.
Process
- Define the item type from the drop-down menu
- Update status and item attributes as per the Configuration Management Plan (guided by Product Descriptions)
- Update product state as defined by the Product Description
- Establish the responsible person and allocate dates
- Identify dependencies/relationships with other CIs
- Mention a unique reference number for item and product identifiers
- Define the stage of CI development
- Store details of the Item Identifier (SKU), current version, stage completed/approved, and date of last status change
- Capture names/departments responsible for maintenance (Owner, Location, Copyholder, Users)
GLP011 Issue Register
An Issue Register is the input document for the Issue Report, logging all formal issues raised during the project, including change requests.
Process
- Define the item type from the drop-down menu
- Describe the issue
- Define the issue type from the drop-down menu
- Establish the date and the person responsible for raising it
- Recognise the person creating the report
- Establish impact, urgency, and priority
- Update the current stage
- Capture the close date
GLP012 Quality Management Plan
The Quality Management Plan includes procedures, processes, tools, and standards describing how the project’s quality is built in from the start (not an afterthought). Quality applies to both project products and project management products (logs, registers, plans, etc.).
Process
- Define how the customer’s quality expectations will be met
- Establish a quality management procedure (quality planning, control, standards, assurance, audits)
- Capture tools and techniques for quality management, including assessment process and timings
- Capture all quality-related events/products in the Daily Log and the Quality Register
- Establish timing for quality management activities and roles/responsibilities for reporting progress
GLP013 Quality Register
A Quality Register logs all quality activities and their status over the course of the project.
Process
- Increment the quality identifier ID
- Name the product being evaluated
- Establish responsibilities for quality management activities (dates/owners)
- Capture details of how/where quality records (e.g. test results) are retained
- Capture the unique product identifier for the quality activity
- Select the quality evaluation method (extendable in the Control sheet)
- Capture the result of the quality activity and the dates/outcomes
- Report on quality plan progress (end stage, exception reporting)
GLP014 Communication Management Plan
One of the most common causes of issues on projects are due to breakdown or confusing communications, and/or delayed or absent responses. A comprehensive Communication Management Plan reduces accidental or deliberate misinformation (spin) and messaging delays for key decision makers; and established accountability for responding to communications and the agreed response times. It defines the communication flow between key stakeholders and the project manager at all stages of the project, and eliminates confusion arising from misaligned communiques entering and exiting the project. This plan should include any corporate or programme metrics and reporting requirements, and their deadlines.
Process
- Define the communication procedure, under formal change control, for the entire project
- Document the tools and techniques for communications
- Describe how and where communication records are maintained
- Describe how communication activities, acknowledgements, and responses will be tracked/reported
- Establish the timings for formal communications, acknowledgements, and response expectations
- Establish the stakeholders and persons responsible for communication at each stage
GLP015 Configuration Management Plan
During the project the project products will either supply, produce or change existing configuration items (CIs), which will bee to be carefully tracked and handed over the operations and/or support organisations. The Configuration Management Plan provides the Project Manager with all the information and systems required and how they are to be controlled, managed and handed over during or at the end of the project.
Process
- Define the configuration management procedure (planning, identification, control, status accounting, verification/audit)
- Establish an issue/change control procedure
- Define composition of Issue Register and Configuration Items Records
- Define the timeframe for implementing the plan and submitting reports
- Establish roles/responsibilities for each step
GLP016 Product Description
A Product Description defines each product to be created in detail. Product Descriptions are usually created and updated in the Manage Stage Boundary process.
Process
- Create a unique identifier for each product as well as the title
- Define the main features of the product and sources from which it will be derived
- State the resources and skills required to create the product
- Define standard checklists and acceptance criteria
- Define tolerances for product variances
- Define roles/responsibilities for quality checks (producers, reviewers, testers, approvers)
GLP017 Product Status Account
A Product Status Account defines the state of the product, and is most useful when different versions of the product are being created.
Process
- Define the scope of the report (version, stage, or entire project plan)
- Define the product status
- Include product identifier and title
- Record the current version
- Record the current status and any changes/development
- Define the product owner, producer, and user
- Compare actual vs. planned timeline for delivery
- List any related configuration items
GLP018 Project Plan
The Project Plan is a formal document that is used for both project execution as well as project control. Following project initiation, it takes over from the PID and drives the project forward, under formal change control as defined by the Change Control Plan.
Process
- Define what the plan encompasses
- State any external dependencies that may affect the plan
- Define the assumptions on which the plan is based
- Define the budget and tolerances
- Capture the product descriptions, schedule, and team delivering them
- Define how the plan will be monitored and controlled
GLP019 Lessons Report
The Lessons Report documents the lessons learnt during the course of the project, that could also be useful in the future and so should be institutionalised by the programme and/or Corporate. It can include tips and techniques, advice on approaches, preferred products, solutions and/or vendors – practically anything that could make a material difference to the project and in future projects.
Process
- Draft the executive summary of lessons learnt (e.g. from a project stage). Summarise all content below
- Define the scope of the report (entire project, a specific stage, or an event)
- Review the project with the management team (methods used, approaches, strategies, controls, issues, changes, unexpected events, recommendations)
- Conduct a measurements review (effort, costs, estimate comparisons, plan effectiveness, issue/risk statistics)
- Document significant lessons, improvements, recommendations, hazards, threats/opportunities, and early warning signs
GLP020 Exception Report
An Exception Report is created when a stage or project breaches any project tolerances, or even threatens to breach them. It is submitted to the Project Board by the Project Manager highlighting the reason for the deviation and recommendations for the way forward.
Process
- Draft the exception title and reason for deviation
- Specify the consequences of the deviation
- Define options to address the deviation, plus a recommended way forward
- Define the risks involved
- Define the timescale for delivering the benefits
- Note any lessons learnt
GLP021 Issue Report/Change Request Report
The Issue/Change Request Report is created to formally raise issues or change requests faced during the course of a stage to the project board. It is created by the project manager during the Controlling a Stage process and should be followed for any material issues or change requests that have been raised, either internally with or externally to the project team. For highly critical and urgent issues the Issue Report may sometimes follow rapid responses/actions taken by the project, in order to document them for later reporting and review, e.g. learned lessons, financial analysis, etc.
Process
- Identify the issue in detail
- Assess the impact of the issue and its criticality
- State the options to resolve it and recommend the best approach
- Specify the action plan
- Assess the implemented solution or actions taken and their effectiveness
GLP022 Benefit Review Plan
A Benefit Review Plan defines how and when the benefits derived from the project will be measured. Benefits may be derived during the project and/or after the project has completed; therefore the responsibilities for tracking the benefits will fall to the senior user of the project products.
Process
- Define the scope of the plan – which benefits it covers
- Specify how and when the benefits will be measured
- Specify how the product performance will be reviewed
- Define who is accountable for achieving these benefits and the resources required for reviews
GLP023 Highlight Report
A Highlight Report is a health check report that a Project Manager prepares to confirm that a stage is being completed within tolerances, or not; and assess whether the project is on track or there are any or foreseeable issues arising from risks.
Process
- Summarise the status of the stage
- Define the work packages covered in this and the next reporting period, plus tolerances
- Review issues and/or change requests raised
- Summarise any insights and lessons learnt
- If required, include a summary of budget progress and expenditure
GLP024 End Stage Report
An End Stage Report is created at the end of the stage and is a comparative analysis of the performance of the stage vs. the original stage plan. It also includes a review of the Business Case and whether it is feasible to continue the project or not, and a summary of the project budget and sunk costs and effort.
Process
- Review the stage performance
- Summarise the rationale for continuing the project, or not, if fundamentals have changed
- Assess performance of products vs. project/stage objectives
- Summarise team performance
- Review all material issues (including change requests) raised
- Describe any lessons learnt
- Describe any anticipated risks
- Summarise financials and effort to date
- Provide a forecast for the next stage and total project costs (e.g. Budget at Completion)
GLP025 Work Package
A Work Package provides information on work activities related to one or more products, assigned to a team. It guides the delivery team members in Controlling a Stage process and outlines the approach, tooling and ways of working to achieve the project products.
Process
- Describe the work in detail, referencing higher-level solution designs or proposals
- Describe roles and name the team members delivering the package
- Specify techniques, processes, and tools (e.g. Scrum, Kanban, SAFe)
- Define communication flow between team manager and project manager
- Define the quality criteria and tolerances for the work package
GLP026 Checkpoint Report
The Checkpoint Report helps the project manager to control the project. It contains the progress of the project compared to the baselined plan. The frequency of submission of this report is agreed upon in the Work Package and is accordingly submitted by the team manager to the project manager. In the event of a material change request, issue or risk being raised the project manager may call for a supporting checkpoint report to be produced in order to underpin these.
Process
- Define the products developed in the current reporting period, completed products, and quality management activities carried out
- Define the products planned for the next reporting period, plus planned quality activities
- Agree the timeframe for completing the current Work Package
- Specify tolerances and note any issues or risks
GLP027 End Project Report
An End Project Report is a formal document submitted by the Project Manager to the Project Board, confirming the delivery of the project products to the users (often a the customer). The Project Board evaluates whether to authorise closure of the project based on this report.
Process
- Describe the project performance
- Summarise the Business Case rationale (benefits achieved/expected, deviations from plan)
- Review objectives achieved within tolerances
- Review team performance
- Review the Issues Register
- Review the Register (e.g. changes, logs)
- Review the products delivered
- Review the project plan
- Review the schedule/budget, highlighting deltas vs. original agreement
- Review any lessons learnt
GLP028 Use Case Document
This template is available as part of GLP000 Glidepath Pack. The Use Case document provides a storyline on how a system and its actors will be utilised to achieve a pre-defined objective.
Process
- Provide a short name for the Use Case as an identifier
- Describe the reason for the Use Case and the expected outcomes
- Define the actors
- Define the precondition and postcondition for Use Case execution
- Describe the sequential flow of activities
- Describe any alternate flow separate from the main flow
- Define any exceptions
- Define any special requirements
- Define associated test cases
- Define user stories for the Use Case
GLP029 Manager Work Schedule
This template is available as part of GLP000 Glidepath Pack in the templates folder. Manager Work Schedule defines the key repeating activities and ownership for the managers on the project. It provides a basis to ensure these stakeholders understand their level of workload and timings of tasks and meetings, which will require additional time for preparation. Using the Manager Word Schedule the project manager formalise these expectations in advance with the individual managers. The project manager may then populate their diaries with meetings for the duration of the project, confident in the commitments made by the manager to the project.
Process
- Define the daily, fortnightly, monthly, quarterly, and annual tasks for executives, team members, and the project manager (per the Communications Plan)
- Set up formal communication meetings, agreeing on schedules/responsibilities for workloads
- Issue meeting invitations for agreed dates/times in accordance with the Communications Plan and Manager Work Schedules
- Track and communicate any schedule changes or exceptions arising in Change Requests or exception reports
GLP030 Stage Plan
A Stage Plan covers the day-to-day activities for a Project Manager using the resources specified in the plan to deliver the project products. The controls to monitor and deliver the products are also mentioned in the Stage Plan.
Process
- Describe what the Stage Plan covers (stage, team, products)
- Capture prerequisites for starting the stage
- Outline upstream/downstream external dependencies
- Capture assumptions, especially scope limitations or exclusions
- Summarise lessons incorporated in the plan and how they are applied
- Define project controls and tolerances for the stage
- Define resources required to deliver products
- Describe the products in detail
- Provide a schedule (key milestones, projected activities)
GLP034 Stakeholder Relationship Organiser
This template is available as part of GLP000 Glidepath Pack in the templates folder. The Stakeholder Relationship Organiser is a Project Manager’s organiser to define and understand the stakeholders in the project.
Process
- Define the stakeholder’s role (sponsor, customer, resource provider, team member, approver, reviewer, end user, etc.)
- Specify if the project team is internal or external
- Define success criteria for the project
- Define ways each sponsor can help the Project Manager
- Identify potential problems caused by stakeholder actions
- Define the Project Manager’s personal action plan for each stakeholder
GLP035 Project Budget & Schedule Tracker
The project budget and schedule tracker helps a project manager and the stakeholders to estimate the costs, track expenses, and plan for any financial contingencies over the course of the project. It employs:
- A simple Gantt chart for waterfall projects but can also be used to capture an Agile sprint plan as a sequence of cascading sprints. It is seldom necessary to capture a detailed task list, but if required, the tasks can be further broken down into subtasks and grouped using to hide the complexity and so retain the readability of the sheet.
- A blended rate for resources. It is often not necessary to maintain 100% accurate time and accuracy at all times as the project costs will often fall under a wider financial accounting system or function, which can be used to reconcile the actual costs on an agreed cadence. If greater accuracy and detail is required, or If daily rates vary significantly, then the Schedule worksheet may expanded to cater for the additional detail.
Process
This template is available as part of GLP000 Glidepath Pack. The project budget and schedule tracker is best used by configuring and adding content to the sheet in the following order:
Control
- Configure the start and the end dates of the weeks from project initiation
- Capture the blended daily rate in order to simplify project tracking
- Capture any alternate daily rates or costs for for external/special resources
Schedule
- Identify the number of planned weeks, starting from project initiation
- From the work breakdown structure and/or content provided by the project delivery teams/vendors, determine the critical path using a project network diagram. This is best done during a workshop with the project delivery team using post-it notes and a white board
- Lay out the critical path for the project by subdividing it into different tasks following the examples provided
- Create floating tasks around the critical paths to ensure the latter is maintained
- Cascade the tasks and link them using cell border formatting to show the cascaded sequence of dependencies
- Enter the budgeted hours for each task across all resources performing the work
- Enter the actual hours logged per week the Time Recording on a weekly basis. Mondays are best as time recording is typically done late on Fridays by the team members:
- The budgeted weekly cost is calculated along with the budget variance
- The actual cost of work performed is calculated
- The sheet auto calculates the weekly variance in the actual cost vs. the budgeted cost
- The weekly change in the budget based on the actual cost is calculated
Time recording
- Identify weeks of the year starting from project initiation
- Allocate the resources required per week. This will include both internal and external resources
- The spreadsheet auto calculates the total labour hours required per week.
This worksheet can be copied to one or more separate spreadsheet(s) in the event that the project financials need to be kept private or secure.
Expenses
Expenses should be agreed and documented as part of the project team briefings and onboarding. Subcontracted work costs should be identified and approved when the project plan is baselined during the Project Initiation stage.
To record expenses:
- Identify the source of the expense or voucher a unique ID such as an invoice number, or a receipt number.
- Identify the expense type or the reason why it was incurred
- Enter the details of the expense – date, amount, detail, the task for which it was incurred and the name of the person submitting it
- Identify the person who has the authority to approve it
- Update the status to approved or rejected
- Capture and upload the source document (receipt, invoice, etc.) to the Expenses folder
- Link the expense ID to the uploaded source document for easier identification and approval
- Obtain approval from the relevant stakeholder for the expense
GLP036 Work Package Tracker and Kanban
The team manager and project manager define the list of deliverables (use cases/user stories) to deliver the work package. The use cases and/or deliverables are estimated, prioritised and assigned based on their readiness. The Tracker columns are auto filtered to allow easy slicing and dicing of the data during review workshops. The Kanban visualises the workflow and automatically reflects the stage of each deliverable.
The team manager and experts on the team will assemble a list of deliverables to be produced from preparatory work for the project, which typically include but are not limited to:
- Business case
- Benefits Register
- Technical and business requirements
- Use and Test cases
- Solution designs
- Vendor proposals
- Risks and Issues Logs
- External dependencies and the wider project ecosystem
- Workshop content
This template is available as part of GLP000 Glidepath Pack for a fee. Create a Work Package Tracker and Kanban for each project team and assign responsibility for completing and managing it to the project team lead. The project team lead owns this tracker and uses it on a daily basis to control the work as defined in the assigned Work Package.
Control sheet
- Capture the programme and project information.
- Assign the team lead and record their name.
- Records – Review the records guidance to be captured and agree with the team on how best to capture them in the tracker. Regularly review the tracker usage with the team and make improvements to suit the work package delivery.
- Status – review the default options for the tracker and align them with the team workflow. It is best to keep this simple but it may be worthwhile adding something like Testing as an additional status. Update the Tracker and Kanban columns to reflect any additions/removals.
- Asignee – capture the names of the team members what will be to which the work will be assigned. Inserting any new names before the last line will ensure that they appear in the Tracker dropdowns which having to update the dropdown range.
- Loop (sprint) and Goal – define the expected number of loop of work to be carried out to deliver the work package. Each loop (sprint) should have a clearly defined goal. While the tracker and Kanban are designed to be used across multiple loops (sprints), the team lead may elect to may a new copy of the tracker for each loop. These copies should be distinctively named, versioned and stored in the project folder.
Tracker and Kanban sheets
- The Team Lead should capture all of the deliverables in the Tracker worksheet and assign them to the Backlog. The team lead will engage the help of the team and the project manager to ensure the Work Package scope is fully understood and captured correctly. Recommendation: Keep the Tracker worksheed clean and simple by only capturing deliverables and not detailed tasks. Where deliverables need to be broken down and tasks assigned, this should be done on a seperate dedicated worksheet, assinged an ID, descriptively named, and cross-linked to the Tracker.
- Conduct backlog review sessions with the team to organise and prioritise the backlog. This is best done in consultation and collaboration with the team to maximise buy-in. Agree the scope, points and value of the deliverable, allowing the team to input their view across business, technical and testing to arrive at consensus for each item. See this Glidepath guide on prioritisation by cost of delay.
- Once a priority factor has been defined for each item, sort the list in descending order to identify the items to be worked on earliest versus items that should be tackled later, or remain on the Backlog.
- Conduct loop (sprint) planning sessions:
- Review the backlog, sizings, value and prioritisation. Where deliverables form part of a depenency chain, ensure their priorities are aligned to sequence them correctly
- Allow the team members to “pull” their own assignments by offering to take on the deliverables and assigning themselves
- Solicit commitment from the team members to specific completion dates for items with external dependencies so these can be tracked and reported on by the team lead, project manager the the project office
- During the loop (sprint) print and subsequent reviews:
- The team lead should update the tracker as each item travels through the workflow. The Kanban should be displayed on a daily basis for the the team members to review, share any blockers, ask for help and suggest changes. The Tracker columns can be filtered to improve focus on the work-in-progress and the Backlog column on the Kanban should be hidden during the sprint to reduce screen clutter; and the temptation to discuss the Backlog items.
- At the sprint review the Tracker should be backed up and archived to capture a shanpshot, which will be useful for reporting and auditing by the team lead and project manager.